
Sunday, August 12, 2012
Awesome GIVEAWAY!!
This giveaway is valued at almost $200 and would be AWESOME! Winning this would make me one happy crafter! :o)

Tuesday, June 19, 2012
Wedding Card
This past weekend I attended a dear friend's wedding so, naturally, I had to make her a card. I mean, what kind of a card maker would I be if I went back to buying them at the store? ;o)
My goal was to create something simple and elegant. I recently purchased a really nice matstack from Die Cuts with a View that includes several glitter pieces. I found one in a two-toned grey damask print that I felt really had a wedding feel to it and I adhered that to the front of my card base after trimming it down.
For my focal image I used another piece of cardstock from that same matstack, except this one was a plain light grey. I trimmed it down to 2" by 2.75", the same size as my mini Cuttlebug folder. I used one of the folders from the Wedding Marriage set, and ran it through my Cuttlebug (yes I DID finally get a Cuttlebug. I will have to do a blog post about all the nifty things I've recently gotten!).
Then I got to play with some of my new heat embossing toys, err, tools to add the sentiment. I used a stamp from the Fiskars "Toss the Bouquet" clear stamp set that simply said "Congrats!", stamped it with VersaMark ink, then used Zing! silver metallic embossing power and my heat tool.
To finish off the focal image, I then rounded the corners very slightly and matted it on a piece of grey cardstock that was slightly darker than the image. I mounted this to the card front with 1/4" dimensional adhesive. I felt there was just something missing, so I added a Martha Stewart white mini pearl to the four corners of the focal image. The front of the card ended up looking like this.

Unfortunately I really don't have a good enough camera to take the great pictures I would like, so you really can't even see the glitter in the background paper, but I think it looks much fancier in person. Here's a close up of the focal image:

For the inside I simply mounted a piece of the same paper I created the focal image with on the right hand side. I did this for two reasons. One, the card base wasn't as thick as I would have liked so it really made the card sturdier. And two, it was a lighter color than the card base, therefore making it easier to read the message I ended up writing on it. Since I was pretty plain, I also applied Martha Stewart mini pearls to the four corners here as well.
This card was a "money" card, so I actually ended up creating a pocket on the inside left using another piece of the glitter paper that I had used for the outside. I just cut it down to be 4.25" by 3" and rounded just one corner. This technique is also good if you're giving a gift card instead of cash. Just remember to only apply adhesive on two of the sides (I put it on the left side and the bottom). When it was mounted to the inside it looked like this:

The one last step to complete the card was to add one of the stamps from a set from My Sentiments Exactly that are designed for the back of a card. I used VersaMark ink and Zing! black embossing powder to add my cheeky touch.

Now I just hope my friend liked it when she opened it!
Happy crafting!
Bridget
Sunday, June 17, 2012
Curious George birthday invitations
Yikes, yikes, yikes...it's been far TOO long since my last post. Being a single mom who works full-time apparently doesn't leave much room for crafting and blogging! LOL Then throw in a sick baby (who shared his germs nicely with Mama) and you just have no energy to create.
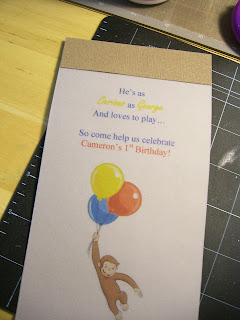
However, somewhere in there I did finally start on the invitations to my son's FIRST birthday party! I cannot believe that he will be one next month. It's just crazy. For those of you who know me (and I realize that's probably most of my readers) you know just how far he's come. Having started out at just 3 pounds and spending 8 weeks in the hospital to where he is now is just amazing. He will be OVER 20 pounds by his birthday! I just love my little chunky monkey with all of my heart! :o)
So, I decided on the theme of Curious George for his birthday. I knew that I wanted to print the actual invitations on velum and have that backed by cardstock, but honestly, I have never printed on velum so I was a bit nervous as to how it was going to come out. I also had a vision of attaching a small banana shaped button at the top to hold it all together. Over the course of the past several months I've had this vision in my head as to how I wanted them to come out, but didn't really know if my ideas could come together. I snapped some pictures to show you my process.
First I designed the worded part of the invitation in Microsoft Word. I found an image of Curious George that I thought was fun and would look really cute on the invitations and put that in the middle of the text. Then I wrote the text around the image.
Next came the actual printing of the invitations onto the velum. I did a lot of reading as to the best way to do this but I think I was really making a bigger deal out of it than it needed to be. The process went very smoothly and they printed beautifully. The one "trick" I found and did use was to change my printer setting to "transparency". I can't say whether this really made a difference though, since I didn't try it any other way.
Then I knew I needed to be able to mail these, so they needed to fit into the envelopes that I have (standard business size), so I knew how big I could make the cardstock backing (4inches x 9.5 inches). I actually added 1 inch to the length so I could fold an inch over to make the top flap that would hold the velum. It looked like this:

Then I lined up the text on the velum so it was in the middle of the cardstock and used my ATG to glue it down. Then I also glued the cardstock flap down.


Then I flipped it over and used Scotch tape to tape the cardstock to the velum, just to hold it in place while I cut off the excess velum.

Then I just peeled off the little bit of tape that was still on the cardstock. Thankfully I didn't have any issues with it ripping the cardstock. I had kind of "unstuck" it before I put it on there anyway buy putting my fingerprints on to remove some of the tack. After that I rounded to bottom corners with my Martha Stewart corner rounder punch.

After that I glued some yellow ric rack along the edge of the flap. When I took these pictures (which was the first batch of invitations) I had used Mod Podge for this step. This worked fine, although it's not the easiest to put on (I ended up using a wooden skewer and rubbing it along the edge) and it bleeds through the ric rack and makes it kind of "crispy" when it dries. For my second batch I picked up some Tombo Mono Multi Glue which worked a lot better. First, it has a nice tiny tip so you can apply it to your project straight from the bottle, and second you don't end up with "crispy" ribbon! But I only have a pic with the Mod Podge.


Just one last step, and that is attaching a cute little banana button in the middle of the top. See? Isn't it cute?

At first I thought I'd punch a hole in the top of the invitation and tie a ribbon through the loop on the back of the button, but that proved to be "fruitless" (hahaha...I couldn't resist). Actually the loop on the button wasn't big enough to go through that many layers so it just looked weird. So, instead I snipped it off and just adhered the button straight to the invitation with some E6000.

Over all I think it came out very cute. It wasn't exactly how I had envisioned it, but it still is cute. The only thing that I don't like is that it's somewhat difficult to see the words "Curious" and "George" since they are in yellow and backed with the brown cardstock. Also I should have probably used a higher weight cardstock, but now I know for next time. Live and learn!
Next I hope to show you a wedding card I just made. Hopefully it won't take me another month to post it!
Happy crafting!
Bridget
However, somewhere in there I did finally start on the invitations to my son's FIRST birthday party! I cannot believe that he will be one next month. It's just crazy. For those of you who know me (and I realize that's probably most of my readers) you know just how far he's come. Having started out at just 3 pounds and spending 8 weeks in the hospital to where he is now is just amazing. He will be OVER 20 pounds by his birthday! I just love my little chunky monkey with all of my heart! :o)
So, I decided on the theme of Curious George for his birthday. I knew that I wanted to print the actual invitations on velum and have that backed by cardstock, but honestly, I have never printed on velum so I was a bit nervous as to how it was going to come out. I also had a vision of attaching a small banana shaped button at the top to hold it all together. Over the course of the past several months I've had this vision in my head as to how I wanted them to come out, but didn't really know if my ideas could come together. I snapped some pictures to show you my process.
First I designed the worded part of the invitation in Microsoft Word. I found an image of Curious George that I thought was fun and would look really cute on the invitations and put that in the middle of the text. Then I wrote the text around the image.
Next came the actual printing of the invitations onto the velum. I did a lot of reading as to the best way to do this but I think I was really making a bigger deal out of it than it needed to be. The process went very smoothly and they printed beautifully. The one "trick" I found and did use was to change my printer setting to "transparency". I can't say whether this really made a difference though, since I didn't try it any other way.
Then I knew I needed to be able to mail these, so they needed to fit into the envelopes that I have (standard business size), so I knew how big I could make the cardstock backing (4inches x 9.5 inches). I actually added 1 inch to the length so I could fold an inch over to make the top flap that would hold the velum. It looked like this:

Then I lined up the text on the velum so it was in the middle of the cardstock and used my ATG to glue it down. Then I also glued the cardstock flap down.


Then I flipped it over and used Scotch tape to tape the cardstock to the velum, just to hold it in place while I cut off the excess velum.


Then I just peeled off the little bit of tape that was still on the cardstock. Thankfully I didn't have any issues with it ripping the cardstock. I had kind of "unstuck" it before I put it on there anyway buy putting my fingerprints on to remove some of the tack. After that I rounded to bottom corners with my Martha Stewart corner rounder punch.

After that I glued some yellow ric rack along the edge of the flap. When I took these pictures (which was the first batch of invitations) I had used Mod Podge for this step. This worked fine, although it's not the easiest to put on (I ended up using a wooden skewer and rubbing it along the edge) and it bleeds through the ric rack and makes it kind of "crispy" when it dries. For my second batch I picked up some Tombo Mono Multi Glue which worked a lot better. First, it has a nice tiny tip so you can apply it to your project straight from the bottle, and second you don't end up with "crispy" ribbon! But I only have a pic with the Mod Podge.


Just one last step, and that is attaching a cute little banana button in the middle of the top. See? Isn't it cute?

At first I thought I'd punch a hole in the top of the invitation and tie a ribbon through the loop on the back of the button, but that proved to be "fruitless" (hahaha...I couldn't resist). Actually the loop on the button wasn't big enough to go through that many layers so it just looked weird. So, instead I snipped it off and just adhered the button straight to the invitation with some E6000.

Over all I think it came out very cute. It wasn't exactly how I had envisioned it, but it still is cute. The only thing that I don't like is that it's somewhat difficult to see the words "Curious" and "George" since they are in yellow and backed with the brown cardstock. Also I should have probably used a higher weight cardstock, but now I know for next time. Live and learn!
Next I hope to show you a wedding card I just made. Hopefully it won't take me another month to post it!
Happy crafting!
Bridget
Wednesday, May 16, 2012
What I Want - Heat Embossing
In last weeks "What I Want Wednesday" post I showed you the Cricut Cuttlebug and talked about its ability to die cut and emboss. What the Cuttlebug does is actually called DRY embossing. There is another type of embossing called HEAT embossing. Both techniques give you somewhat similar results in the end, in that your paper is embossed with an image, however there are some differences that make having the ability to dry AND heat emboss ideal.
To do heat embossing you need a few tools. You need some sort of an embossing medium, usually in the form of either an "ink" pad (a lot of people call it ink, but in my mind it's not really ink because, when I think of ink I think of color, and it usually stamps clear) or in a pen (which is the exact same stuff as what's on the pad, just in pen form). In my travels, I've mostly seen the brand VersaMark used, however I'm sure there are other brands out there.


Again, this is just one brand of powder. There are many other brands of embossing powders out there in lots of colors and textures. Some are matte and some are very sparkly. It just depends on what look you are trying to achieve.
The last thing you need to heat emboss...is the heat! You need a handy dandy little tool that looks somewhat similar to a hair dryer, just a different shape. Actually there are certain versions of them that do look exactly like those little hair dryers that you usually find attached to the wall in a hotel bathroom because, again, there are several brands to chose from.


To do heat embossing you need a few tools. You need some sort of an embossing medium, usually in the form of either an "ink" pad (a lot of people call it ink, but in my mind it's not really ink because, when I think of ink I think of color, and it usually stamps clear) or in a pen (which is the exact same stuff as what's on the pad, just in pen form). In my travels, I've mostly seen the brand VersaMark used, however I'm sure there are other brands out there.
You also need some embossing powder. The powder comes in many colors and will dictate what color your image is when it's set.
Again, this is just one brand of powder. There are many other brands of embossing powders out there in lots of colors and textures. Some are matte and some are very sparkly. It just depends on what look you are trying to achieve.
The last thing you need to heat emboss...is the heat! You need a handy dandy little tool that looks somewhat similar to a hair dryer, just a different shape. Actually there are certain versions of them that do look exactly like those little hair dryers that you usually find attached to the wall in a hotel bathroom because, again, there are several brands to chose from.
Once you have all of these, relatively inexpensive tools, you're ready to start heat embossing! The only other thing you really need are some rubber or acrylic stamps of images that you want to emboss on your projects. Someday when I have the ability to heat emboss I'll probably do a video demonstration and add it to my blog, but until then you can search for videos on YouTube to see just how easy it is. Then you will know why I want to be able to heat emboss! It adds a lot of "specialness" to your projects with very little effort.
Happy crafting!
Bridget
Tuesday, May 15, 2012
Temporarily sidetracked
Yikes, yikes, yikes...it's been too long since my last post! Regretably it's also been too long since I've been creative. :o( I know this blog is supposed to be all about crafting, but to add a little bit of my personal story for a minute, it's been a crazy week!
I am a single mother to a fabulous (almost) 10 month old little boy. He came 10 weeks early and spent 8 weeks in the hospital, therefore, I'm now a staunch supporter of the March of Dimes. This past weekend our team participated in our very first March for Babies and raised a total of $1603, so as you can imagine I have been busy fundraising and then making sure everything was done in time for the walk. It was a great day and I can't wait until next year, but I'm kind of glad it's over. Phew!
Now I'm going to have to switch gears and focus on my son's FIRST birthday party! I'm very excited about that too! I have lots of crafty ideas and will be making the invitations and some of the decorations (hopefully) so I am planning on posting about those in the near future.
I made a few Mother's Day cards, but stupidly only took photos of one of them before I sent them out. On top of that, I had the brilliant idea, albeit too late, to photograph the process of making the card, so that's my plan for the future. I haven't put the photos of the card on my computer yet, so until then, here's a picture of my 30 week miracle to tide you over!

I'll update this with the photos and info on how I made the Mother's Day cards when I get a second (and I'm not at work!). Until then, happy crafting!
Bridget
Wednesday, May 9, 2012
What I Want Wednesday
Last Wednesday I did a "What I Love" and this week I'm going to do a "What I Want" (which is a huge list, so that gives me LOTS of ammo for future posts!).
Anyway...after watching countless YouTube videos of crafty ladies, I've really been wanting an embossing machine. I've been doing a lot of research, some on YouTube and some reading reviews, and I've been eyeballing the Cricut Cuttlebug.

Besides having the cutest name ever, this little machine can really do some cool things. Not only can it emboss your paper and cardstock, but you can use cutting dies and also cut shapes from your paper. And the real cool thing is that it works with ANY brand of dies that are out there now. Of course there is the ones made especially for the Cuttlebug, but there are also other brands that will work too (probably the most popular being the Spellbinders Nestibilities I'd guess).
But I'm really interested in it's embossing capabilities. The embossing folders look like this:

They are, in fact, folders, in that they are connected on one end and open on the other. You place your paper or cardstock inside it, run it through the Cuttlebug, and it comes out looking like this:

This example is obviously not made with the folder shown (and it's NOT a card I made...because I don't YET have a Cuttlebug!), but you get the idea. See how such a simple design can be so beautiful? NOW do you know why I want one?
I've discovered a website that sells all Cricut related products at greatly reduced price. The Cuttlebug retails at many stores for around $90, but I found it for just $40. Um, yeah, I don't think there's really too much of an excuse to NOT get one now!
What's on YOUR wish list?
Happy crafting,
Bridget
Anyway...after watching countless YouTube videos of crafty ladies, I've really been wanting an embossing machine. I've been doing a lot of research, some on YouTube and some reading reviews, and I've been eyeballing the Cricut Cuttlebug.

Besides having the cutest name ever, this little machine can really do some cool things. Not only can it emboss your paper and cardstock, but you can use cutting dies and also cut shapes from your paper. And the real cool thing is that it works with ANY brand of dies that are out there now. Of course there is the ones made especially for the Cuttlebug, but there are also other brands that will work too (probably the most popular being the Spellbinders Nestibilities I'd guess).
But I'm really interested in it's embossing capabilities. The embossing folders look like this:
They are, in fact, folders, in that they are connected on one end and open on the other. You place your paper or cardstock inside it, run it through the Cuttlebug, and it comes out looking like this:
This example is obviously not made with the folder shown (and it's NOT a card I made...because I don't YET have a Cuttlebug!), but you get the idea. See how such a simple design can be so beautiful? NOW do you know why I want one?
I've discovered a website that sells all Cricut related products at greatly reduced price. The Cuttlebug retails at many stores for around $90, but I found it for just $40. Um, yeah, I don't think there's really too much of an excuse to NOT get one now!
What's on YOUR wish list?
Happy crafting,
Bridget
Sunday, May 6, 2012
My first challenge submission
I took a little break from blogging yesterday to attend a family gathering. We've recently had an influx of babies born into the family (one of them being mine, who is 9 months old) so it was sort of a "meet and greet" of the babies. But I guess it was kind of ironic that I didn't get to do much scrapping on National Scrapbook Day!
I DID, however, get a card made for a giveaway contest on Above Rubies Studio. The challenge was to create a card (or scrapbook layout) to "make someone's day", so really no specific meaning, just something that might brighten the receiver's day. Megan, the founder of ARS, also had a request to include the colors yellow and grey (or at least one of those colors). I don't really have much in the way of greys, but I was able to include quite a bit of yellow).
Here's what I came up with:

I saw this "pinwheel" technique on YouTube (I can't remember who I got it from off the top of my head, but I can look it up and update that later) and have been dying to try it ever since. As it looked, it WAS super easy and I think it came out really cute. I got the patterned paper from JoAnn's and it's one of my favorites. I just think it's so cute.
To make the sentiment mat I used a rub-on from a Making Memories sticker/rub-on pack that says "You are my sunshine". I wanted to dress it up a little bit (and I didn't have thin red ribbon, or I would have used that) so I hand cut one of the bees and ladybugs from a scrap of the paper. Then I hand drew in the little "bee trail". I think it came out pretty cute. Here's a close up of the sentiment:

Clearly I need to set up some sort of "photo studio" to have a better place to take photos, but this is what I've got for now!
This is a really simple card, so I'm doubting that I will win the challenge, but it was definitely fun to make it. I envision many more pinwheels to come as they are quite versatile and you can change the mood, theme, and use just by changing the colors.
What do you think?
Happy crafting!
Bridget
Friday, May 4, 2012
Some of my favorite sites for supplies
I have several favorite sites for shopping for supplies. I am going to add a list on the left of my page of the links to those pages, but thought I'd post a bit about some of them in case anyone was interested.
I probably do the bulk of my supply shopping at Amazon or JoAnn Fabrics (which is WAY more than just a fabric store). I live in a fairly rural area so we don't have a lot in the way of choices for brick and mortar shops, but I do have a JoAnn's about 30 minutes from my house that I can literally spend hours in. They recently expanded it too, which made me so very excited! But because gas is around $4 per gallon, I don't make it down there too often. That's why I do a lot of online ordering, and Amazon and JoAnn's online shops are amazing. Really anything you could want. Plus, if you have Amazon Prime you get free two day shipping!
I recently discovered Scrapbuck.com and let me tell you...I LOVE IT! I got a nice haul from them on my first order which included many stamp sets, dementional adhesives, storage containers, and stickers all for under $40. I should have taken a picture because it was definitely photo-worthy! Along the same note as Scrapbuck is Create for Less. Their website says they have over 60,000 products, which includes more than just papercrafting supplies.
A few more websites that I've just recently discovered are the Eyelet Outlet and Consumer Crafts. I haven't placed an order with them yet, but it's not because I haven't found anything that I want! In fact, I want a LOT of things from both sites. The Eyelet Outlet has the CUTEST eyelets and brads that you've ever seen.

See? Sock Monkey brads. Cute, huh? You want some, don't you? Just $2.99 for 12 of them.
So what are some of your favorite websites to shop for crafting supplies? Where do you find the best deals?
Happy crafting!
Bridget
I probably do the bulk of my supply shopping at Amazon or JoAnn Fabrics (which is WAY more than just a fabric store). I live in a fairly rural area so we don't have a lot in the way of choices for brick and mortar shops, but I do have a JoAnn's about 30 minutes from my house that I can literally spend hours in. They recently expanded it too, which made me so very excited! But because gas is around $4 per gallon, I don't make it down there too often. That's why I do a lot of online ordering, and Amazon and JoAnn's online shops are amazing. Really anything you could want. Plus, if you have Amazon Prime you get free two day shipping!
I recently discovered Scrapbuck.com and let me tell you...I LOVE IT! I got a nice haul from them on my first order which included many stamp sets, dementional adhesives, storage containers, and stickers all for under $40. I should have taken a picture because it was definitely photo-worthy! Along the same note as Scrapbuck is Create for Less. Their website says they have over 60,000 products, which includes more than just papercrafting supplies.
A few more websites that I've just recently discovered are the Eyelet Outlet and Consumer Crafts. I haven't placed an order with them yet, but it's not because I haven't found anything that I want! In fact, I want a LOT of things from both sites. The Eyelet Outlet has the CUTEST eyelets and brads that you've ever seen.
See? Sock Monkey brads. Cute, huh? You want some, don't you? Just $2.99 for 12 of them.
So what are some of your favorite websites to shop for crafting supplies? Where do you find the best deals?
Happy crafting!
Bridget
Thursday, May 3, 2012
How do I start my own crafting blog?
I was reading some questions in response to a post over at Above Rubies Studio that several people had about starting their own craft blog and it inspired me to do a post on the topic.
Blogs are everywhere today and I've actually "met" several people through "blogland" that I still consider to be friends, even though we've never met in person. That's the beauty of the internet and social networking. However, it can be kind of intimidating when you finally decide to start your own if you've never done it before. Luckily, you don't have to be a computer genius to do it (thankfully, because I'm about as far from a computer genius as you can get!).
There are many hosting sites out there to choose from and they have made it very user-friendly for us non-computer geeks. A quick check of Google for "free blogs" reveals more choices than any human could ever need. The most popular sites seem to be Blooger (where I chose to create mine) and Wordpress but, like I said, there are MANY more. One sight, Mashable, published a list of over 40 free blog hosting sites broken down into various categories, so just choosing a hosting site can be more difficult than creating the blog itself!
Many, many moons ago I had a blog on MSN Spaces, however since it's been so long since I've used it, I'm not even sure I can find it anymore! I remember it being very easy to create, however I think there were some limitations on who could leave comments, etc. (had to be an MSN subscriber or something).
Anyway, when I decided to jump back into the blogging world I did a little bit of research (emphasis on "little"). I have some friends who have blogs so I started with looking to see what hosting site they were using. Blogger and WordPress seemed to win out (although there were a few others). Then I went to the homepage for both Blogger and WordPress and looked around. Both sites have a lot of information about what their site offers and you can even find short video clips and demos. Basically I chose to go with Blogger because it seemed less "cluttered" to me. I was also able to explore some of their layouts and page themes and just decided that it seemed easier. That is just a personal opinion though, and just based on a few minutes on their site. I'm sure many people could argue the same is true for WordPress, but the beauty of free will is that we all get to make our own choices. Mine was to go with Blogger. And just for the record, I do NOT get any sort of compensation for this opinion. It is just that. My opinion.
If you go with Blogger, you can "take a tour" on their page and it briefly explains what they offer. Decided that you want to create a blog with them? Just click on the "Create Blog" button and you're off an running! You will get a screen that looks like this:

You have to have an email address, which most of us do, so that's easy. Blogger is a Google company, but you do NOT have to have a gmail address (I don't and it worked just fine). Then you will create a password. Next you will see "Display Name". That is NOT the actual name of your blog, but rather the little footer that appears on all of your posts. Therefore, it doesn't have to be related to your blog theme or title (it can be your first name, for instance). I just happen to like everything to "match" so I chose SWAK Designs so it relates directly to my blog title, but you don't have to.

The next half of the screen is just your gender, birthdate (I'm not really sure why they need this except that maybe they have a minimum age requirement or something), a word verification (to make sure that you are, in fact, a real live person and not a robot...seriously, they do use the word "robot" if you type the word wrong and they don't think you're legit. It's kinda funny, but anyway...), and acceptance of their terms.
When you click "continue" you will get to this screen:

This is where you will enter the title of your blog, the name that appears across your header. This too is easy because they don't limit the number of blogs with the same title. However, the web address (or URL) is a different story and can be a bit tricky. You want it to make sense and go along with your blog so it will be easy for people to remember and find, but there obviously can't be more than one blog with the same URL, so this step might take a few minutes. You can enter a choice and the system will let you know if it's already taken. Then you will have to come up with something else. For example, I chose SWAKDesigns first and, of course, it was already taken, so I had to chose something different. It took a few tries, but I finally found one that worked and my blog was born!
Then you get to play around with the fun stuff. Templates and colors and fonts, oh my! If you click on "Design", located near the top right of the screen, you will get to your main "control panel" screen and from there you can click on "Templates". The templates are laid out and you can click on them and they will change on your screen, showing you what your blog will look like using that template. Once you find one that you like, you can customize it further by changing the font and color of your titles (but you don't have to). It will show you your "live view" in a box sort of near the middle of the screen and the button underneath that "Customize" will allow you to do that. It does take a little bit of playing around to figure out where everything is and how it all works, but you really can't screw it up. Besides, there's always the "help" button if you get stuck. So go ahead and take the plunge into the world of blogging!
I hope I was helpful and didn't make it more confusing. Like I said, I'm no expert, but thought it might be nice to share some of my experiences with you.
Happy crafting (and blogging)!
Bridget
Wednesday, May 2, 2012
What I'm Loving Wednesdays
I've decided to make a few regular themed posts and I'm starting with a "What I'm Loving (or What I'm Wanting) Wednesday". In these posts I will highlight some of the things I'm either loving or dying to get my crafty little hands on.
What I'm Loving - Adhesives
For my first post I'm going to introduce you to a fun little gadget which also happens to be a necessity. Now, I realize that a lot of you probably already have one, but for those of you on the fence about whether or not you need one, I will tell you know that you DO. What is it that I'm talking about...?
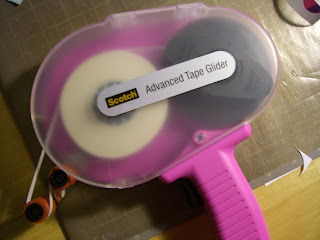
The Scotch Advanced Tape Glider...or ATG as it's commonly referred. Actually, most people call it an ATG gun but, since I'm a police officer by day, the word "gun" has a different meaning to me and I don't like to use it for something that simply dispenses adhesive, if you know what I mean. But whatever you call it, it's awesome.
If you're a papercrafter, adhesive is a major necessity, obviously. And yes, this contraption is large and doesn't travel quite as well as a tape runner, but it lasts considerably longer...and the adhesive is nice and strong...and is glides on very easy...and HELLO, it's pink! Need I say more?

I was resistant to get one, thinking it wasn't necessary, but when you see how fast you can go through the small tape or glue runners, you suddenly realize why this beauty is a must. And don't let the size intimidate you, it's incredibly lightweight, surprisingly so actually.
But there are times when you definitely need a fine point, after all, the ATG is not a one-stop-shop for all your adhesive needs. There are many glue pens out there, but my pen of choice is the Zig Two-Way Fine Tip (full disclosure, I've only tried one other glue pen, so it's not like I'm an "expert", but I like the versatility of this glue pen).

It's called "two way" because it can be used two ways (imagine that!). It goes on blue and dries clear. If you stick your paper down when it's still blue you will get a permanent bond. However, if you let it dry until it's clear and THEN stick your paper down, you will get a removable bond (kind of like a Post-it note). See? Versatility! That is important to me because I'm an imperfect crafter and I make mistakes. I like being able to "fix" them if necessary.
There's one more "category" of adhesives in every papercrafter's stash and that's dimensionals. Again, I haven't experimented with too many brands so I'm not sure really what ones are the "best", but I do know that it's handy to have them in different shapes and sizes. Here's a few of the ones I have. Half inch circles, half inch squares, and 1/8 of an inch circles. I have some other sizes too, but these are the ones I seem to use the most.

The 1/8 inch ones are super tiny and can be difficult to use if you're not patient, but I used them on a birthday card recently and I couldn't be happier with how it came out. What do you think?

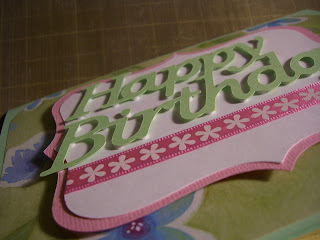
The "Happy Birthday" is on the 1/8" dimensionals (which took me about an hour to do!) and the mat is on the 1/2" circles. If you're wondering, I got the Happy Birthday and the mat both from the Martha Stewart Elegant Cake Art Cricut cartridge (page 67 for the phrase, and page 73 for the mat). The phrase is cut at 2", the pink mat is cut at 3.5" and the white mat is cut at 3.25".
So those are some of my favorites when it comes to adhesives. What are yours and why?
Get crafting!
Bridget
Tuesday, May 1, 2012
Welcome!
Hello friend, and welcome to my crafty space. I've always loved being creative and have dabbled in many craft mediums from yarn (knitting and crochet), watercolors, polymer clay, resin, and now papercrafting, where I've recently found a love of cardmaking and want to share it with you.
I plan on showcasing my work as well as giving tips and tricks that I've picked up along the way. I'd also love to learn from you so if you have something you'd like to share, please do, my door is always open, as they say, so who's with me?
Come on in and let's get crafting!
Bridget
I plan on showcasing my work as well as giving tips and tricks that I've picked up along the way. I'd also love to learn from you so if you have something you'd like to share, please do, my door is always open, as they say, so who's with me?
Come on in and let's get crafting!
Bridget
Subscribe to:
Comments (Atom)